I’ve justs got hold of a NAO from Aldebaran robotics. I’ll be using this project to keep track of my
progress,
Thai "Disconnect to Connect" TV advert
I ocasionally read Chinasmack, a website that aims to give some insight into the internet stories that are currently hot in china. One of the recent stories featured a Thai TV advert urging people not to forget those around them when using mobile devices. It’s a bit schmaltzy but the point is still valid.
Many of the (Chinese) comments translated by Chinasmack were words to the effect of “no Chinese company would make such an advert” (implying that it was a shame) and I was struck by a similar feeling that no British/American company would either. For the last few months in fact London tube stations have been plastered by adverts suggesting the the very opposite: namely the RIM “Live your life on BBM” posters (or words to that effect, will check for sure next time I pass one).
From Chinasmack (translation of Chinese text from youku):
When we become addicted to using the internet and mobile phones to interact,
we neglect our loved ones and friends beside us. Thailand’s DTAC
telecommunications company released a “Disconnect to Connect” advertisement
campaign, telling us to cherish the people beside us. (Is this the so called
corporate social responsibility?)
Blakes 7 retrospective and thoughts on fandom
I was 11 years old when Blake’s 7 first appeared on British TV and I still
remember the buzz it caused. The only competing science fiction shows of the
time were Star Trek and Doctor Who and Blake’s 7 captured the imagination of a
generation. I even remember the headmaster at my junior school using Blakes 7
as an example of something during one assembly (although I can no longer
remember the point the headmaster was trying to make).
Several years after the series finished the BBC released it on video - I
wanted to buy them but didn’t have the money. I’m glad of that now as having
to wait meant I could buy each series as a DVD box set rather than a shelf-
full of bulky VHS video.
Another advantage of having to wait is that I have been able to rediscover
Blake’s 7 together with my children. My 8 year-old son finds it scary in
places but has been enjoying it. I was a little nervous at first because
Blake’s 7 has a reputation for poor quality special effects (it was produced
on a ridiculously small budget and so the special effects were cheap even at
the time) and in the thirty years since the end of the series technology has
improved considerably. Thankfully, even though the effects are dodgy in places
the characters, storyline and the dialogue make it all worth watching.
The most memorable character has to be Kerr
Avon - the perfect cynical foil to
the idealistic Roj Blake. In fact
one thing that makes the whole cast of “good guys” stand out is that, apart
from the principled Blake they all have their own agenda and there is sense
that rather than being on a mission the crew is just a temporary alliance of
convenience.
The main antagonist is Servalan the
leader of the Federation’s (an oppressive regime run from Earth) military
force. Servalan is notable not just for her seductive aspect and relentless
unprincipled pursuit of power but because, unlike many modern day fictional
villains (for which low IQ seems part of the job description), she is
intelligent and despite Blake and his crew having more advanced technology at
their disposal they never manage to achieve victory over the Federation.
Servalan is aided by
Travis) who seems much
more of a comic book henchman - brutal and very one-dimensional.
The Liberator) is
possibly the coolest science fiction spacecraft ever, for me it is at least as
iconic as the Starhip Enterprise. Another feature of Blake’s 7 is that the
Liberator was controlled by an artificial
intelligence (AI), called
Zen). Unlike contemporary
Star Trek episodes (as I recall anyway) in which a lot of button pushing goes
on, the crew of the Liberator use voice commands and engage in a dialog with
Zen. After the Liberator is destroyed the ship used in the final series,
Scorpio), is also AI
controlled by the more obsequious Slave. A third AI,
Orac), also appears in the
series - Orac is notable for being bad tempered and preferring to be left to
its own devices.
Whilst indulging in a rush of Blake’s 7 nostalgia I came across an interview
with Paul Darrow (the actor who
plays Avon) which is worth watching (see links at end). Mr Darrow makes
several interesting points including that since Kerr Avon was not the lead
character Darrow had much more freedom in playing Avon and so whereas Blake
had to be the good guy Darrow was able to make Avon a more ambiguous and much
more interesting character. Darrow also commented that Avon was a tragic
character who ends up killing the only woman he ever loved (who turns out to
have been a Federation agent) and the only friend he ever had (Blake).
A consortium bought the rights for Blake’s 7 and their have been plans for a
sequel and then, later a remake but so far the only thing that has come of
this is a series of audio episodes. B7 Productions
announced in August 2010 that its partner Sky1 has dropped plans to
commission a remake. Paul Darrow also wrote Avon a terrible
aspect,
a novel about Avon’s early life before circumstances throw him together with
Blake.
When you enjoy something there is always a desire to have more of it. In the
case of TV series, films or books when you can’t actually make more of the
thing yourself fandom and finding out the depths of the story can seem very
enticing as can hints of a new series. But ultimately these are things that
can take a lot of time and not give much in return - best to just enjoy the
thing for what it is, revisit it occasionally but move on rather than obsess
about it.
- DVD releases: Series 1, Series 2, Series 3, Series 4
- Paul Darrow interview on youtube: part 1 part 2 part 3
- Blakes 7 / B7 Media
- Wikipedia article
- You’re Him, Aren’t You?: An Autobiography by Paul Darrow
- Avon: A Terrible Aspect, a novel by Paul Darrow
- Blake’s 7 Appreciation Society
- Blog entry: A new future for Blake’s 7 by Martin Anderson
- A review of a model of the Liberator
Getting Things Done, Kanban, Emacs and org-mode
I started using GNU Emacs when writing
my PhD thesis in LaTeX and ironically that was probably the time, at least up
until recently when I knew most about emacs and was capable of writing bits of
elisp to customise my environment. After finishing my PhD I still used emacs
but not exclusively and gradually forgot everything except the basic set of
text editing commands.
All that changed in 2010 when I started attending the Clojure dojos organised
by the London Java Community
where emacs is the default development environment and learning a bit more
about editing lisp code in emacs comes in useful. I also attended an emacs
showcase in November 2010
where I learned about org-mode for emacs.
What is Emacs anyway?
Before I go any further I should probably say a bit about GNU
emacs for any of you who’ve never used
it. Emacs has been in existence for decades and was written to very extensible
and customisable. It is based around an implementation of lisp referred to as
emacs lisp (or more simply elisp) with some built-in functionality to support
text editing. Emacs runs on just about every platform out there and has a huge
number of extensions (or modes) that support almost every programming language
I can think of as well as other tasks such as reading email, reading usenet
news, interacting with version control systems (there are mods for CVS,
Subversion, git, bzr and others). Emacs can manage multiple windows and can
split each window into multiple views - this makes it easy to have parts of
many files visible at once as well as different sections of the same file -
I’m so used to how easy emacs makes this that I feel restricted using IDEs
such as eclipse even though they have the ability to split the main editing
window. Emacs has a reputation for being difficult due to the huge number of
key commands that exist but it is an immensely powerful system if you’re
willing to spend the time to learn the basics.
org-mode
org-mode is “is for keeping notes, maintaining ToDo
lists, doing project planning, and authoring with a fast and effective plain-
text system.” org-mode works by using a number of simple textual conventions
in ordinary plain text files. For example asterisks () are used to indicate
headings with the number of asterisks indicating the depth of the header (
for level 1, ** for level 2 etc). The tab keys allows you to fold/unfold
headings making org-mode an easy to use outline editor (I’ve started using it
for note taking based on this ability alone). However there is much more to
org-mode than just an outlining editor: it can create sparse views showing you
only the parts of a document that match your criteria; you can add tags to
items; it can manage to-do items with arbitrary states (eg TODO, PLANNED,
DOING, DONE, CANCELLED) and that’s just getting started. org-mode also has an
agenda view that can pick todo items out of a file and show them based on date
and tags. This is powerful as it means you can mix to-do items in with notes
on a subject and still have a view showing only to-do items with a selected
state (ie show only the in-progress to-do items that are due before Monday).
org-mode has excellent documentation and there are many tutorials out there
(see references at end of this post) so I won’t say any more about it’s
features - suffice it to say that org-mode has got rave reviews and is one of
the things that convinced me that I need to improve my emacs-fu.
Getting Things Done
For several years I’ve been interested in ways of using my time more
effectively. I’ve used various combinations of software, text files, paper etc
but nothing has quite worked out for me as either the method seemed too
heavyweight and I spent a disproportionate amount of time working the system
or planning or the method itself was lightweight but not effective.
For a couple of months I’ve been trying the Getting Things Done (GTD)
methodology by David
Allen. I think the key concepts are to get
everything written down in a way that both makes it clear what you need to do
to resolve an item and in what context you can take that action. So that in a
given context (eg at the office) you can easily see what are the actions it
makes sense to do now and ignore everything else. This is effective because,
if done well, the lists of items should make it clear what action needs to be
taken (so you don’t waste time working out what you need to do) and when you
can do it (so you don’t waste time looking at things you can’t take any action
on at the moment anyway). I first learned about GTD by reading David Allen’s
excellent
book
and using plain text files in emacs to make my lists of “stuff.” Later on I
wondered if org-mode would help manage the lists I was creating and, guess
what, there are several excellent tutorials on exactly that (see references).
Kanban
This week I went to see John Stevenson talk about
Personal Kanban at Skillsmatterin London. I’ve heard of
Kanban before but never used it. John
did an excellent job of explaining the basics of Kanban and gave plenty of
examples of how he used. At the core Kanban seems to be a technique for
allowing you to focus and limit the amount of work in progress at a given
time.
After the talk I was convinced of two things:
- I should try using Kanban both at home and with my team at Ecube Ltd
- GTD and Kanban have enough in common there should be some synergy in using the two together
GTD and Kanban
And so finally we come to the point of this post! It seems to me (as a
neophyte of both GTD and Kanban) that both techniques are about focus: that is
your view is limited to what it makes sense to do at any given time and
avoiding the need to keep thinking about what to do next. GTD makes a greater
emphasis on organising things by context and Kanban is a purely visual
technique. It also occurred to me that maybe the org-mode agenda view could be
made to behave like a kanban board and so it would be possible to have the
graphical simplicity of Kanban and still take advantage of all org-mode’s
features and avoid being locked into using any proprietary software.
At this point I would like to conclude with a rousing story showing how I
successfully fused concepts from GTD and Kanban to revolutionise the way I
work. However, it’s way too early for that so I’ll write another post once I
have anything more worth saying on the subject. In the meantime I would
definitely encourage you to take a look at the links below and see if Emacs,
GTD, Kanban or all three could be of use to you.
References
- Getting Things Done by David Allen (Amazon)
- The org-mode site
- Org Mode - Organize Your Life In Plain Text!
- Charles Cave’s tutorials on org-mode and GTD
- Charles Cave’s tutorial on using dates in org-mode
- David Allen’s website
- Getting started with “Getting Things Done”
- Wikipedia article on Getting Things Done
- Wikipedia article on Kanban
- Video of John Stevenson’s talk on personal kanban
New blog-- The Code Road
For a while now I’ve wanted to write more about software development. However,
I still want to write about various personal projects and other random stuff
that would dilute the posts on software development. After some dithering I’ve
decided to create a new blog, The Code Road, to
focus on software development and use davesnowdon.com for personal projects
and other random stuff that I feel like writing about.
The blog’s name was inspired by the Iain Banks
book The Crow
Road.
Partly because I like the name and Banks is one of my favourite authors. I
also like the metaphor of software development being a road/path/way in the
martial arts sense.
The first post on The Code
Road is about my experience so far in migrating a
site from the Prototype Javascript library to
jQuery
Anne Margaret Snowdon 1937-2010 R.I.P.
Goodbye Mum

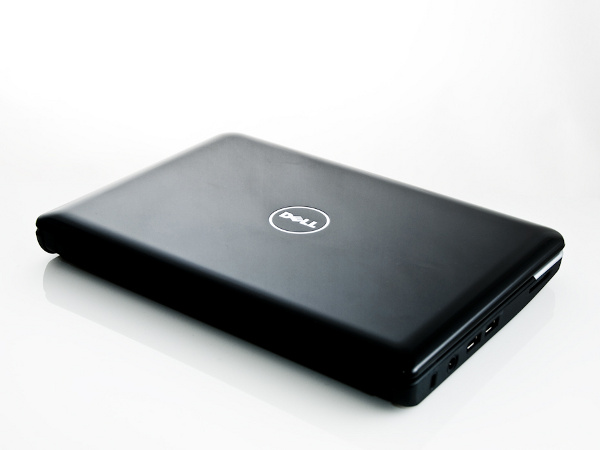
Dell mini 10v netbook (mini review)
I spend about 3 hours commuting most working days and although this gives me
plenty of time to catchup on my technical reading I’ve been thinking that it
would be good to have a small laptop/netbook so I could do some coding too.
I’ve tried using my work 15” Dell Precision laptop for this but it’s too big
for the cramped tube seats so I’ve been looking for a small and cheap “commute
compute” device. I finally decided to give the Dell mini 10v a try.
The mini 10v looks good and feels solid with a generally good build quality.
The screen is clear and easy to read and overall I’m pretty happy with the
hardware. The screen resolution is 1024x600 which means that larger dialog
boxes don’t always fit on the screen. My main gripe is the trackpad: rather
than having separate buttons the bottom left & right corners of the trackpad
function and buttons. These button areas are not very sensitive and I found
that there is a tendency for the mouse pointer to move a bit when you press
the “buttons” which means that it’s easy to miss the target if the area you
are trying to click on is small.
Before I continue, let’s have a few photos… (by G.
Snowdon)


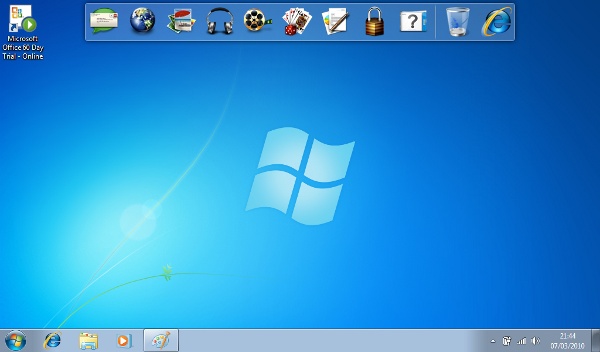
The min10v comes with Windows 7 starter for small notebooks. I won’t say a
great deal about this as I wiped it soon after receiving the machine. I did
poke around a little bit first though and here are a couple of comments
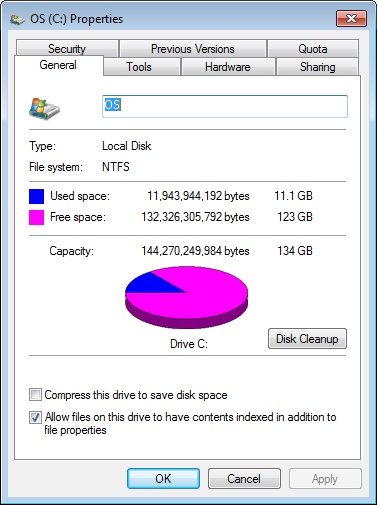
Amazingly of the 160Gb only 134Gb is visible on the main partition and of this
a stunning 11Gb is already in use. The missing space is taken up by two other
partitions. I have not investigated yet but I imagine one is a Dell system
restore partition. The net result is that there is only 123Gb available for
use.
When booting, it takes about 30 seconds to get to the password prompt, and
another minute for the desktop to complete loading (taskbar becomes visible).
However, waking from sleep (eg after closing the lid) seems pretty quick.
Unfortunately, in addition to Windows 7, some crapware in the shape of McAfee
is installed. MS Works is also installed, as is a 60 day trial of MS Office
Home & Student edition 2007 which pesters you for a product key every time you
start it.
Otherwise that’s about it. The basic Windows accessories are there, as are the
standard Windows games and MSN messenger. Strangely clicking on the “games”
icon on the dock only gives you the option of downloading games and does not
display the games under the Windows / All Programs / Games menu.
There is a website, www.mydellmini.com dedicated
to the Dell mini series of laptops. Looking at the operating
systems area of the site’s forums it looks like people are
not only using the 10v for Windows (XP, Vista, Windows
7) but also
Ubuntu and Mac OS X.
Goodbye SPIP; Hello drupal
After months of procrastination, over the Christmas break I finally got around
to converting my site from running SPIP to running
drupal. SPIP is easy to use and configure and quite good
at what it’s aimed at - on-line magazines. However, I never really got on with
with it and got the site set up the way I wanted. Most of this is probably my
fault as I know it’s possible to customise the display of SPIP articles and
listings quite heavily but to do any of this seems to require hacking the
templates written in SPIP’s own style and I could never quite convince myself
to invest this level of effort in relatively little used piece of software as
I knew I probably wouldn’t make use of this knowledge outside of my own site.
There were other things that bugged me about SPIP too:
- I found the “typographical shortcuts” irritating and wanted to be able to use whatever HTML tags I liked (although this should have been possible it never seemed to work right, especially when I wanted to use a bit of Javascript).
- I got a lot of comment spam and although SPIP is relatively good at avoiding spam from dumb robots the spam filtering plugins seemed infrequently maintained).
- When you delete a comment it’s still visible on the admin page (but marked as deleted) - this meant that my admin area was drowning in deleted spam comments making it awkward to see the genuine comments.
- I wanted more control over the way the site worked
Now, with more work I could have probably addressed all this (for example
writing some PHP to to really delete deleted comments or modifying SPIP to do
so) but I just couldn’t work up the enthusiasm.
The obvious contenders for replacement software were:
All have their good points but I went with drupal as it has a reputation for
being efficient, programmer friendly and very configurable.
Initially I was not that impressed with drupal as the core modules didn’t seem
to do a lot but I slowly realised that (with drupal 6.x at least) it’s the
architecture of the module system combined with the available modules that
really make it great. Here’s a quick list of what’s impressed me so far:
- The Views & CCK modules make it very easy to create custom content types with different types of additional fields (relationships to other content (nodes) or users, dates, amazon product ids and many more) and produce views showing selected fields from these custom types in the way you want. For example it was quite straightforward - once I’d worked out how - to create content types to represent ongoing projects, another type to represent updates to those projects (like a blog) and link the project updates to their respective projects all without writing a single line of PHP.
- The control available over setting up the navigation and the structure of the site and the ability to mix automatically generated URLs with manually created ones.
- The shear ease of adding new functionality (google sitemaps, tag clouds, spam filtering) just by installing modules.
- The level of integration between drupal and its modules and between the various modules - I’ve installed 24 modules now and they all place nicely together.
- The way you can easily move blocks of content around on the page and configure what content is displayed on what pages.
It’s taken me a lot longer to put together this incarnation of the site
compared with the SPIP version but it does so much more and I feel much better
about it. My wife has got very tired of me jumping up and down excitedly each
time I discover a cool feature or something else I can do.
That said I’m not happy with the current (graphical) design of the site and I
need to invest more work there.
So far the only thing about drupal that’s disappointed me is the site
statistics (*see update below). The built in statistics package is quite
basic. There is a module that integrates with google analytics but it would be
nice to have a simple graphical display of site and/or article access over
time built right in without the hassle of going to the google analytics site.
SPIP had exactly this (see image below) which let you see the good or bad news
very quickly and easily as well as drill down to see which articles were
generating the hits and how the level of hits was changing over time. If
anyone knows of a drupal module that can do this please let me
know.
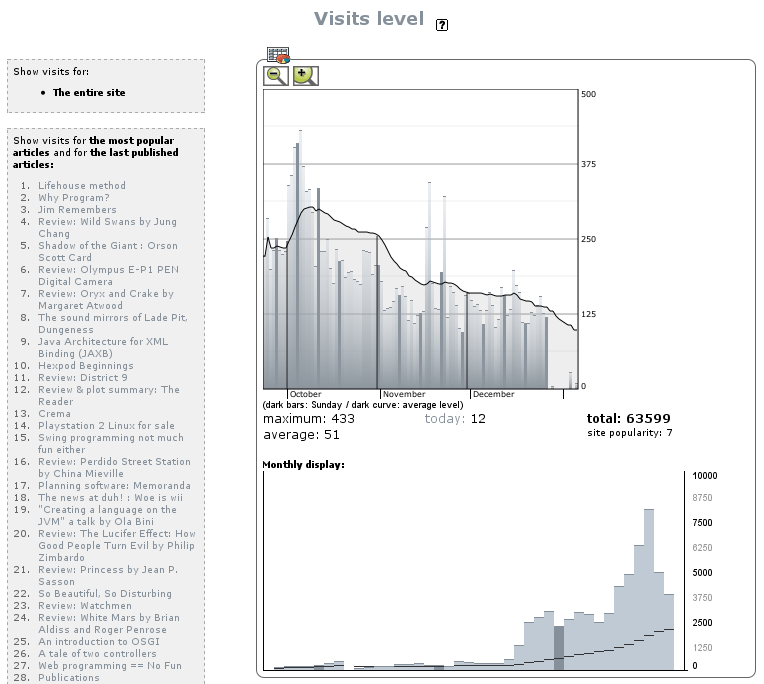
The blank space at the end of the graphs is because I took this screenshot
from a local copy of SPIP using a version of the database I took a snapshot of
a couple of weeks ago.
So in summary: very happy with drupal and heartily recommend it if you don’t
mind investing effort in getting everything configured. I still need to invest
a fair bit of effort myself to add new features (like using the amazon module
to show data from amazon in reviews) and improve the presentation of the site.
Update 10th January 2010
I have just discovered the graphstat
module which provides some of what I was
missing although the graphs are not as well displayed as the SPIP equivalents
and the module does not seem to be very configurable. That said it appears to
have been abandoned until the end of December 2009 when a new maintained,
weboholic, took responsibility for it, so I
have hopes that the module will continue to improve.
Getting started and physical assembly
The goal of this project was to construct a low-cost expandable robot platform
that Aurorans members can build on without a lot of hardware.
Danny and I reckoned
that most technology enthusiasts would have a laptop and using a laptop gives
the advantage of a familiar environment for for use and development of the
software for the robot. Besides the laptop and some standard rechargeable
batteries the components required for version 1 are:
I had an old Dell M40 laptop lying around that I was not doing anything with
so although it’s a little old and underpowered it makes a reasonable choice as
a controller (large display, networking, USB, speakers etc). It’s main
disadvantage is that it’s large and heavy and only has 256Mb of RAM. I wanted
to build something that placed the laptop a reasonable height off the ground
to make it easier for people to interact with - luckily I had the frame of an
old steel chair lying around - much to my wife’s despair I do tend follow in
my Dad’s footsteps and keep stuff thinking “it will come in useful one day”
which provides the required and and some scraps of laminated chipboard for the
chassis and laptop mount.
Chipboard is not my first choice of material since it’s quite heavy relative
to its strength but the local Homebase failed utterly to provide anything more
useful (was hoping for some thick plywood but would have had to buy a 8’x4’
sheet when I only wanted a 42cm square piece. Since chipboard is too weak for
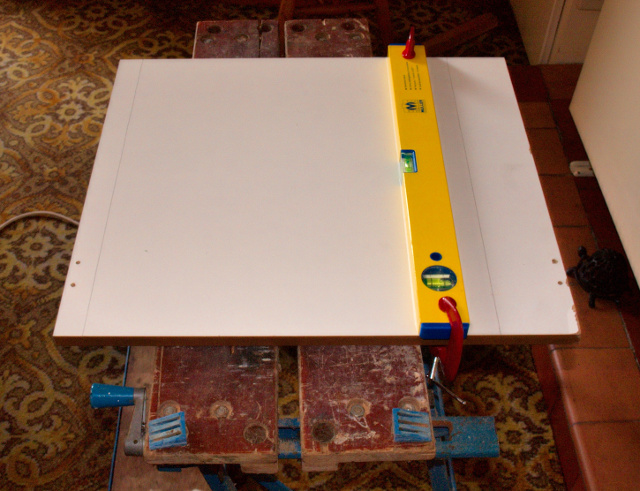
me to rely on woodscrews to attach the hardware I was forced to drill through-
holes and bolt everything to the chassis as shown below.
Here’s the chipboard for the top and bottom and the remains of the dismantled
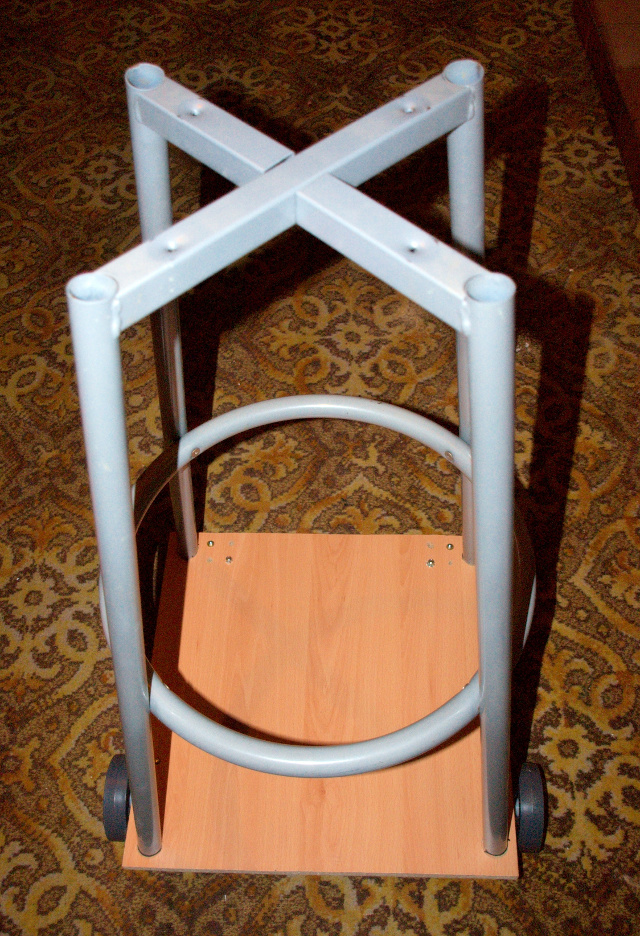
chair that will raise the platform off the ground.
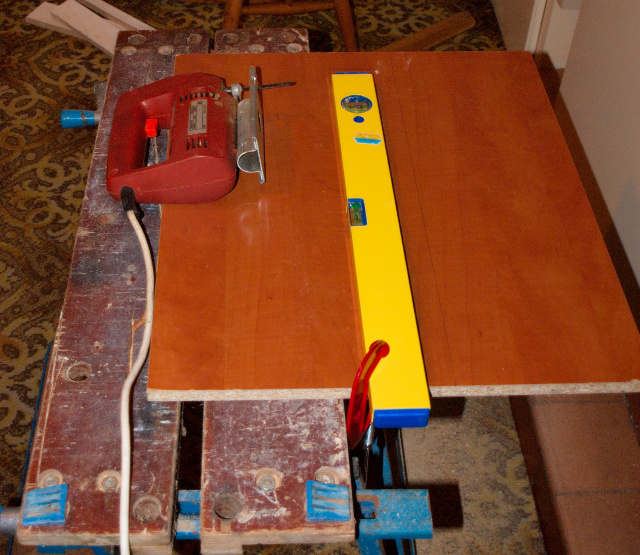
Here the chair frame has been re-assembled and placed on the cut-to-size
chassis to check dimensions.
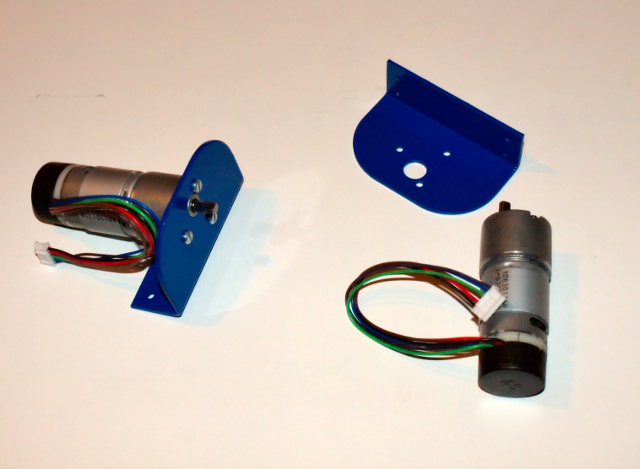
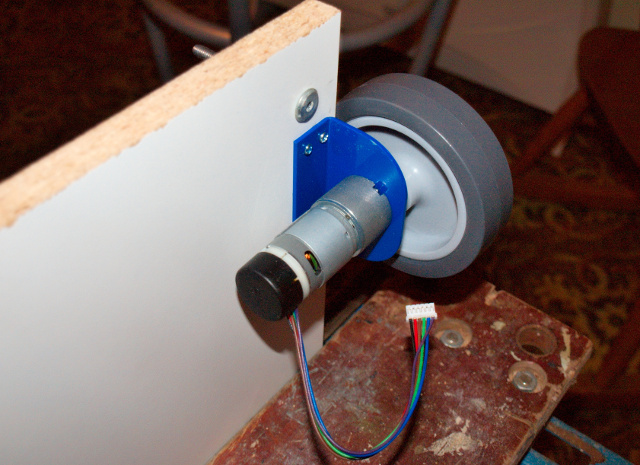
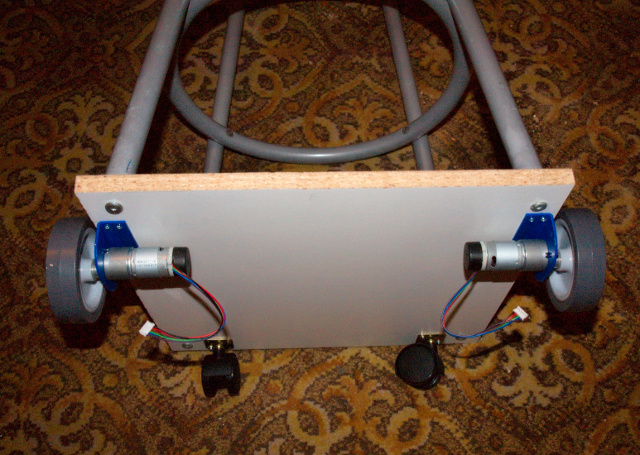
Here are the motors, wheels and mounts from the RD02 drive system
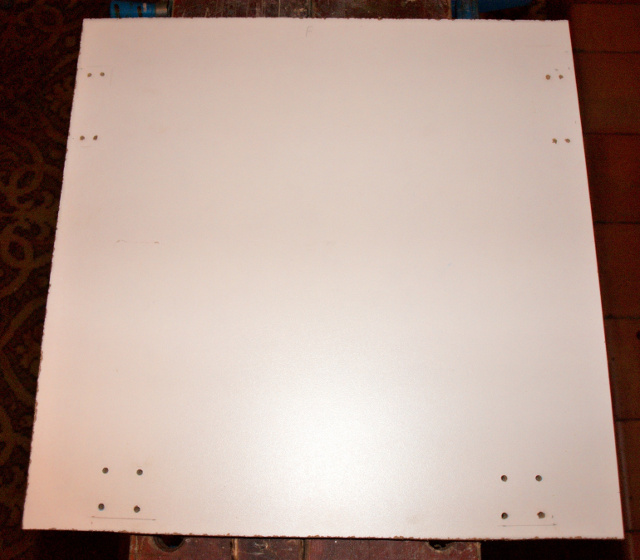
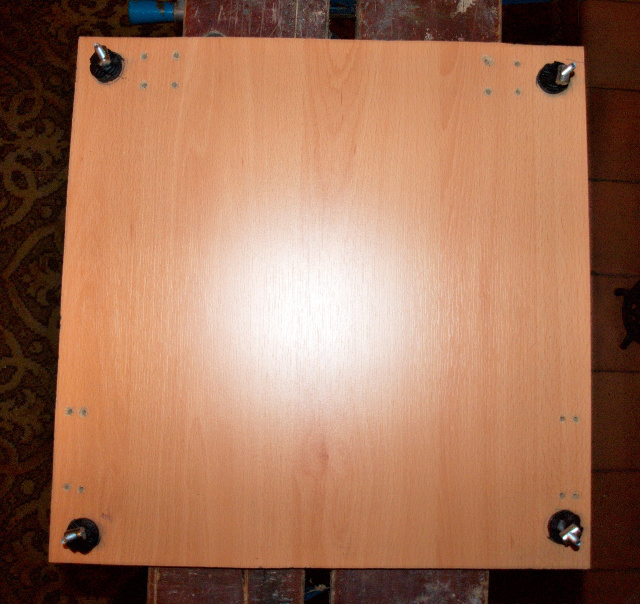
The underside of the chassis with the bolt holes for the motor mounting
brackets and castors drilled.
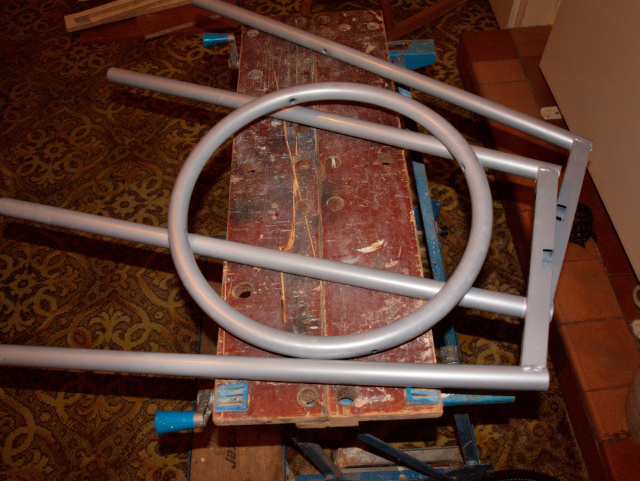
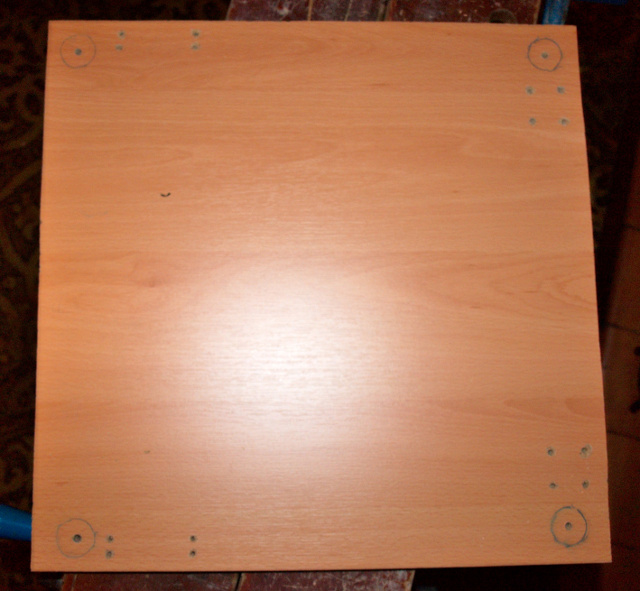
The upper side of the chassis with the positions of the chair legs marked.
I decided to attach the chair legs to the chassis by putting bolts (saved from
when we dismantled our daughter’s cot when she became old enough for a proper
bed) through the chair feet. This method is simple but has the disadvantage
that the chair is only held to the chassis by the friction between the plastic
feed and interior of the chair leg - fortunately this seems to be sufficient
as long as the robot is not lifted by its top for too long.


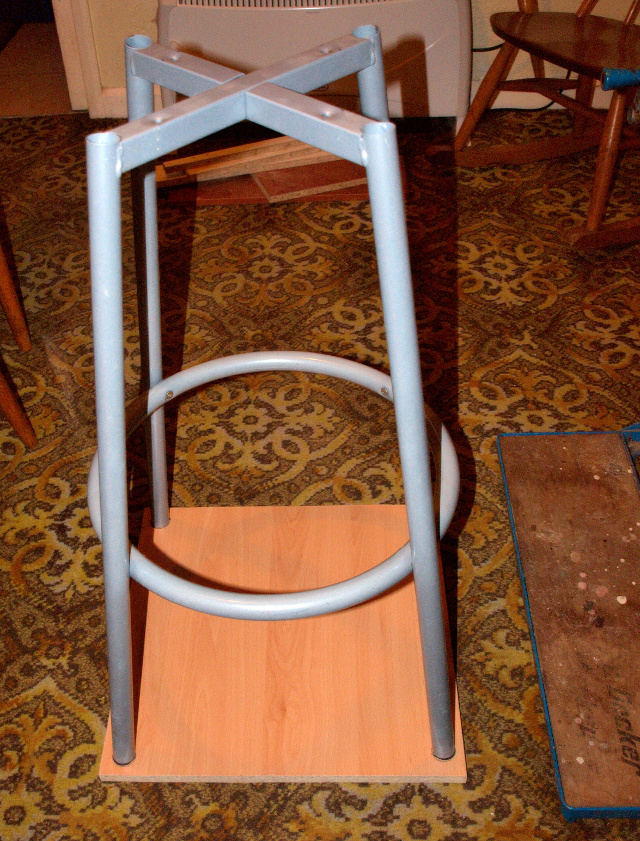
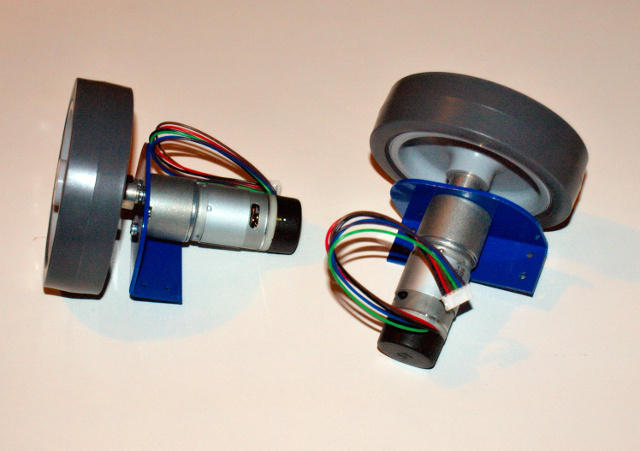
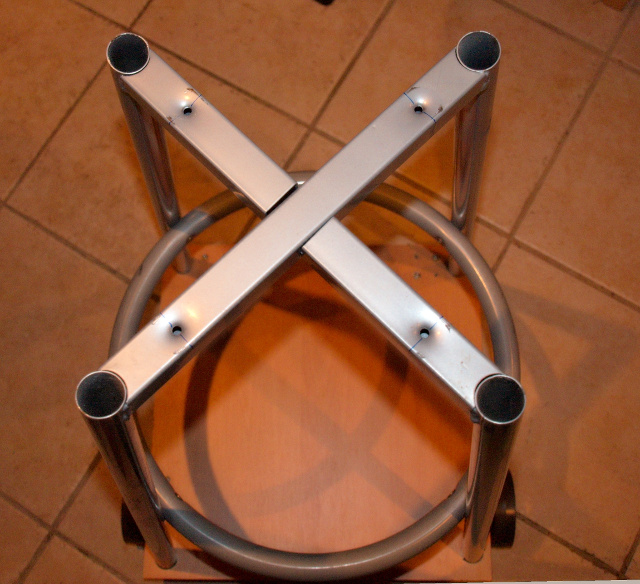
The motors and castors attached to the chassis.
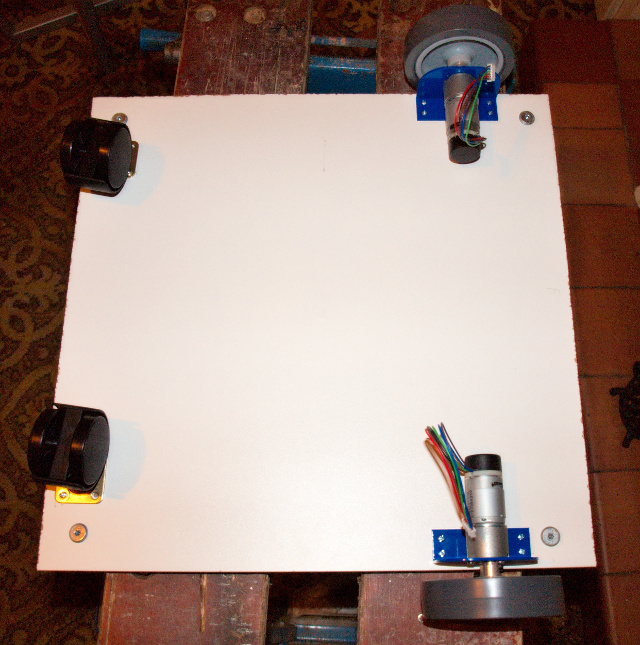
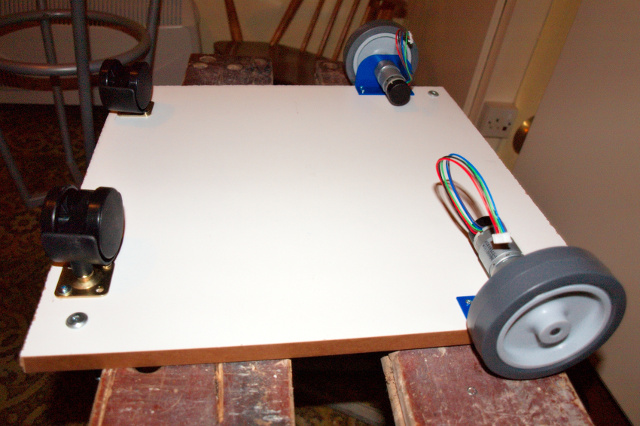
The chair frame attached to the completed chassis.
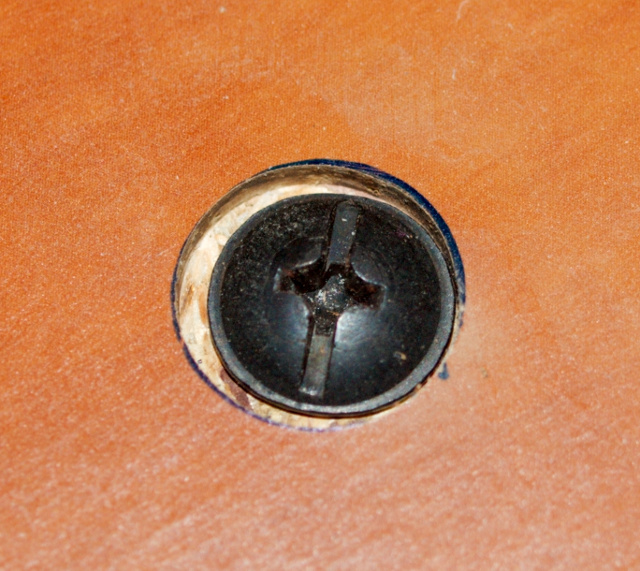
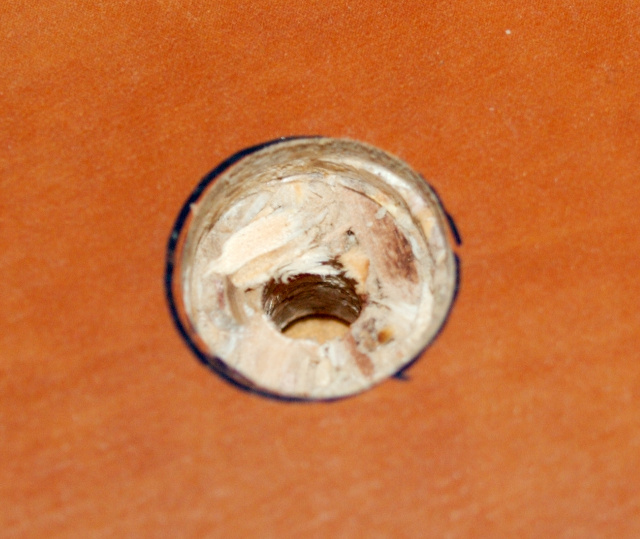
Since the laptop’s base is quite flat I needed to make the bolts attaching the
laptop platform to the main base flush with the surface. I did not have a
drill large enough to make a hole for the bolt heads so had to use a router to
enlarge the holes for a depth of about 3mm (this is why the large holes are a
little sloppy). These photos show the the mounting holes with and without a
bolt.
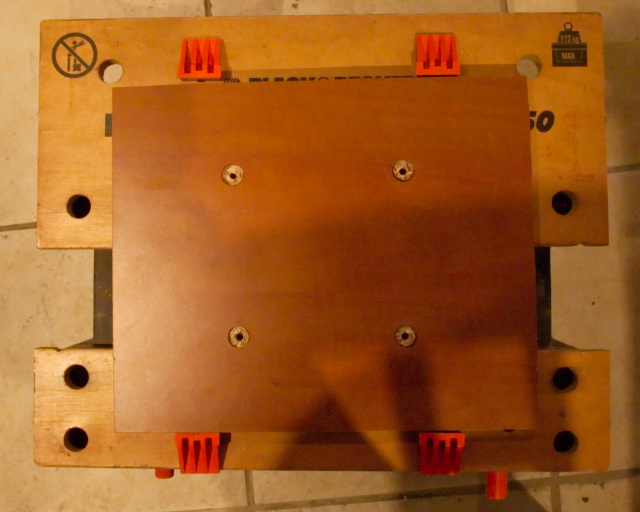
Top of the chair which handily already had drilled and tapped bolt holes
(originally used to attach the mounting bracket for the chair itself).
The completed robot platform without the laptop
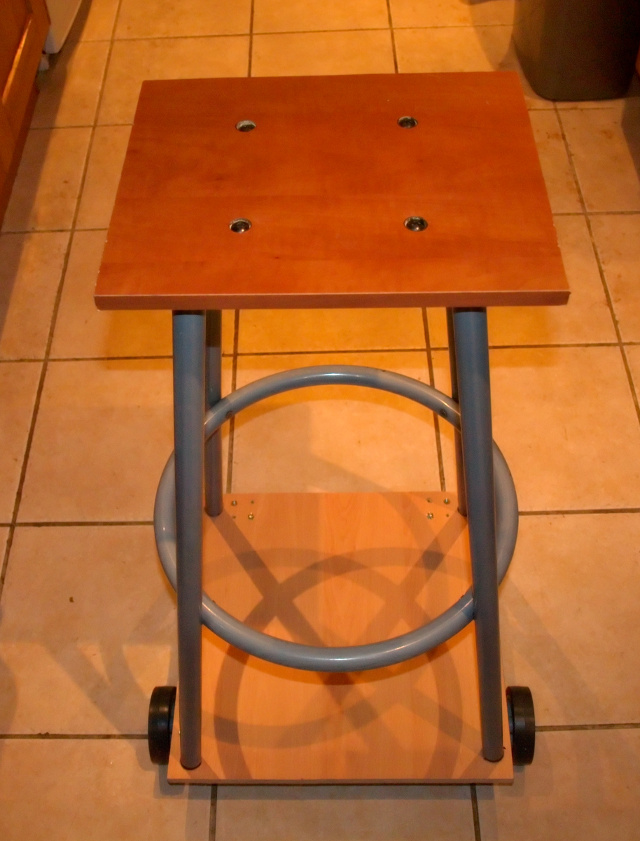
So what we have at this point is a wheeled base with a platform for a laptop
on top. There are several advantages and disadvantages to this design.
Advantages
- The laptop is placed at the useful height off the ground and so we can make use of the display for interacting with people.
- The chair frame provides a strong mount for any additional hardware we might want to add later.
Disadvantages
- The result is quite heavy and the laptop is also heavy so the motors may struggle to move it and if they do it will quite likely be slow.
Welcome
Welcome to my personal web site.
I’ve just finished migrating all the content from SPIP to drupal 6 and things
(such as the page design) are still rough around the edges. I have set up
redirects for some of the more popular pages. If you’ve followed a link here
and were expecting to see something else it probably means I did not set up a
redirect for the page you were looking for - in that case please use the
search box on the top left.